Auto Mouse Click
Automate mouse clicks with the Auto Mouse Click utility. Define the click type, X coordinate, and Y coordinate, specify whether to return the mouse cursor to its original location, and automate mouse clicks. Download and try Auto Mouse Click on a physical Windows computer for free. Auto Mouse Click allows you to group mouse clicks (a Mouse Click Script or Macro) and save them in a file for later use. The saved Mouse Click Script / Macro can be loaded and run at any time.
You can also watch a Video for Automating Mouse Clicks at the bottom of this page. The short video demonstrates all the steps outlined below.
Once the free trial ends, you can unlock the Auto Mouse Click software utility by paying USD 9.87 on 1 Windows computer for up to 6 months from the date of payment.
How to Auto Mouse Click
The steps below outline how to automatically initiate mouse clicks. The procedure to auto mouse click is divided into 3 steps.
You can also save mouse clicks to a file and run them automatically by double-clicking the Mouse Clicks (.mamc) file, or schedule them to run at a specified time using Task Scheduler.
Step 1: Download Auto Mouse Click
Download and launch the Auto Mouse Click software utility. During installation, you can opt to create a desktop shortcut or launch the utility from the Programs menu.
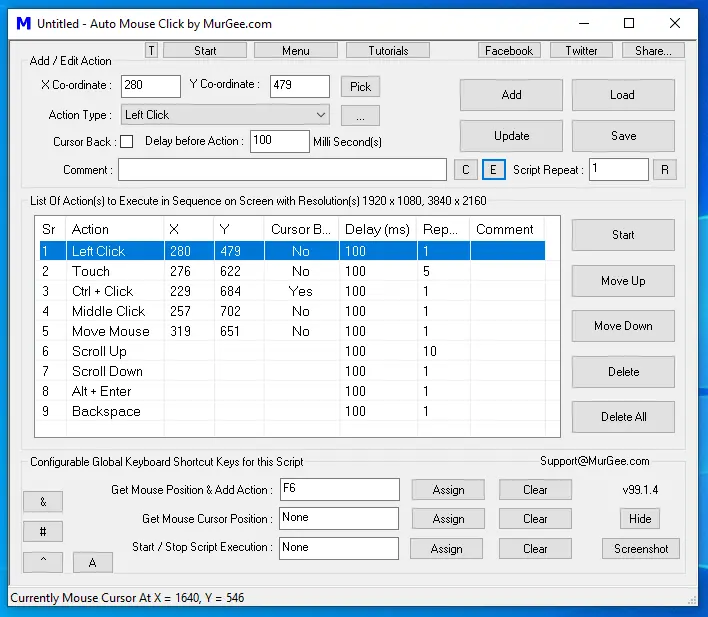
Step 2: Configure Hotkey to Get Mouse Cursor Position
The steps below outline how to capture the mouse cursor position automatically by pressing a configurable hotkey. If you already know the X and Y coordinates, you can also enter them directly in the main window of Auto Mouse Click.
- Look at the bottom of the software utility under Other Settings to find the Hotkey setting for getting the mouse position.
- Press any key to assign as the shortcut (for example, F6) and click the button labeled Assign.
- Test the new hotkey to capture the mouse cursor position: move the mouse cursor anywhere on the screen and press the hotkey.
- Whenever you press the configured hotkey, the current mouse cursor location is filled into the X Coordinate and Y Coordinate boxes at the top of the Auto Mouse Click utility.
- Now you have a hotkey that automatically captures the mouse cursor position (X and Y coordinates).
Step 3: Automate Mouse Clicks
The steps below outline how to automate mouse clicks with this utility. You simply specify where to click, define the click type and delay, choose whether to return the mouse cursor to its original location, and start the script.
Once you finish specifying the mouse clicks, start automation by clicking the button labeled Start, and stop it by clicking the button labeled Stop. The edit box labeled Repeat Count lets you specify how many times the complete mouse click script should run.
Let's start by specifying the mouse clicks to automate. You can also save the mouse clicks to a file to run them later. The Repeat Count value specifies how many times all the mouse clicks should run: a Repeat Count of 0 runs the clicks indefinitely, while any other number specifies the exact number of times the script runs.
- Once you have the desired X and Y coordinates on the screen, you can automate mouse clicks (left single click, right single click, and double clicks).
- Select the Click Type (Left Click, Right Click, etc.) from the drop-down box next to Click Type.
- If you want the mouse cursor to return to its original location after clicking the specified X and Y coordinates, check the box labeled Cursor Back.
- If you leave the Cursor Back checkbox unchecked, during click automation the mouse cursor moves to the specified X and Y coordinates, performs the click, and remains at the click location.
- The edit box labeled Delay before Click lets you specify the delay in seconds for a given mouse click.
- Once you finish configuring the mouse click, click the button labeled Add.
- After adding a click, test it by clicking the Start button. Use the Stop button or close the software utility to stop automating mouse clicks.
- By repeating the steps above, you can add more mouse clicks and save them to a file for later use.
- To edit an existing mouse click, select it from the list of mouse clicks, enter the new values, and click the button labeled Update.
Schedule Automatic Mouse Clicks
To run automated mouse clicks at a specified date and time, you need two things: first, save your mouse clicks to a file by clicking Save Clicks; second, use a scheduler such as Windows Task Scheduler. You can also double-click the saved Mouse Clicks file (.amk) to run the mouse clicks automatically.
Auto Mouse Click in Action
Watch the Auto Mouse Click utility in action in this video, which shows how easily you can automate mouse clicks. Specify X and Y coordinates, define the click type (left or right button, single or double click), and set the delay in seconds. Add as many mouse clicks as you want to automate and click the Start button. Download Auto Mouse Click and try it yourself to see how useful it can be, or read our short guide to Auto Mouse Click before downloading the utility.
Double-click the video to watch how to auto-click the mouse to repeat tasks in full-screen mode.
Register Auto Mouse Click
At the end of the trial period of the Auto Mouse Click software utility, a pop-up window will appear asking you to pay the activation fee to unlock the trial. Once you are satisfied with the free trial, pay the fee to receive an activation key and unlock the software.
Contact Us
Do you see any feature missing in the Auto Mouse Click utility? Drop us an email at support@MurGee.com, and we will do our best to implement it.
Another mouse cursor automation program named Auto Clicker offers an easy-to-use, hotkey-controlled mouse clicker. Visit the MurGee home page for more mouse automation tools and software downloads.